
I had a busy week with trying to finish up a bedroom that I had started earlier as well as holding a Valentine themed birthday party.
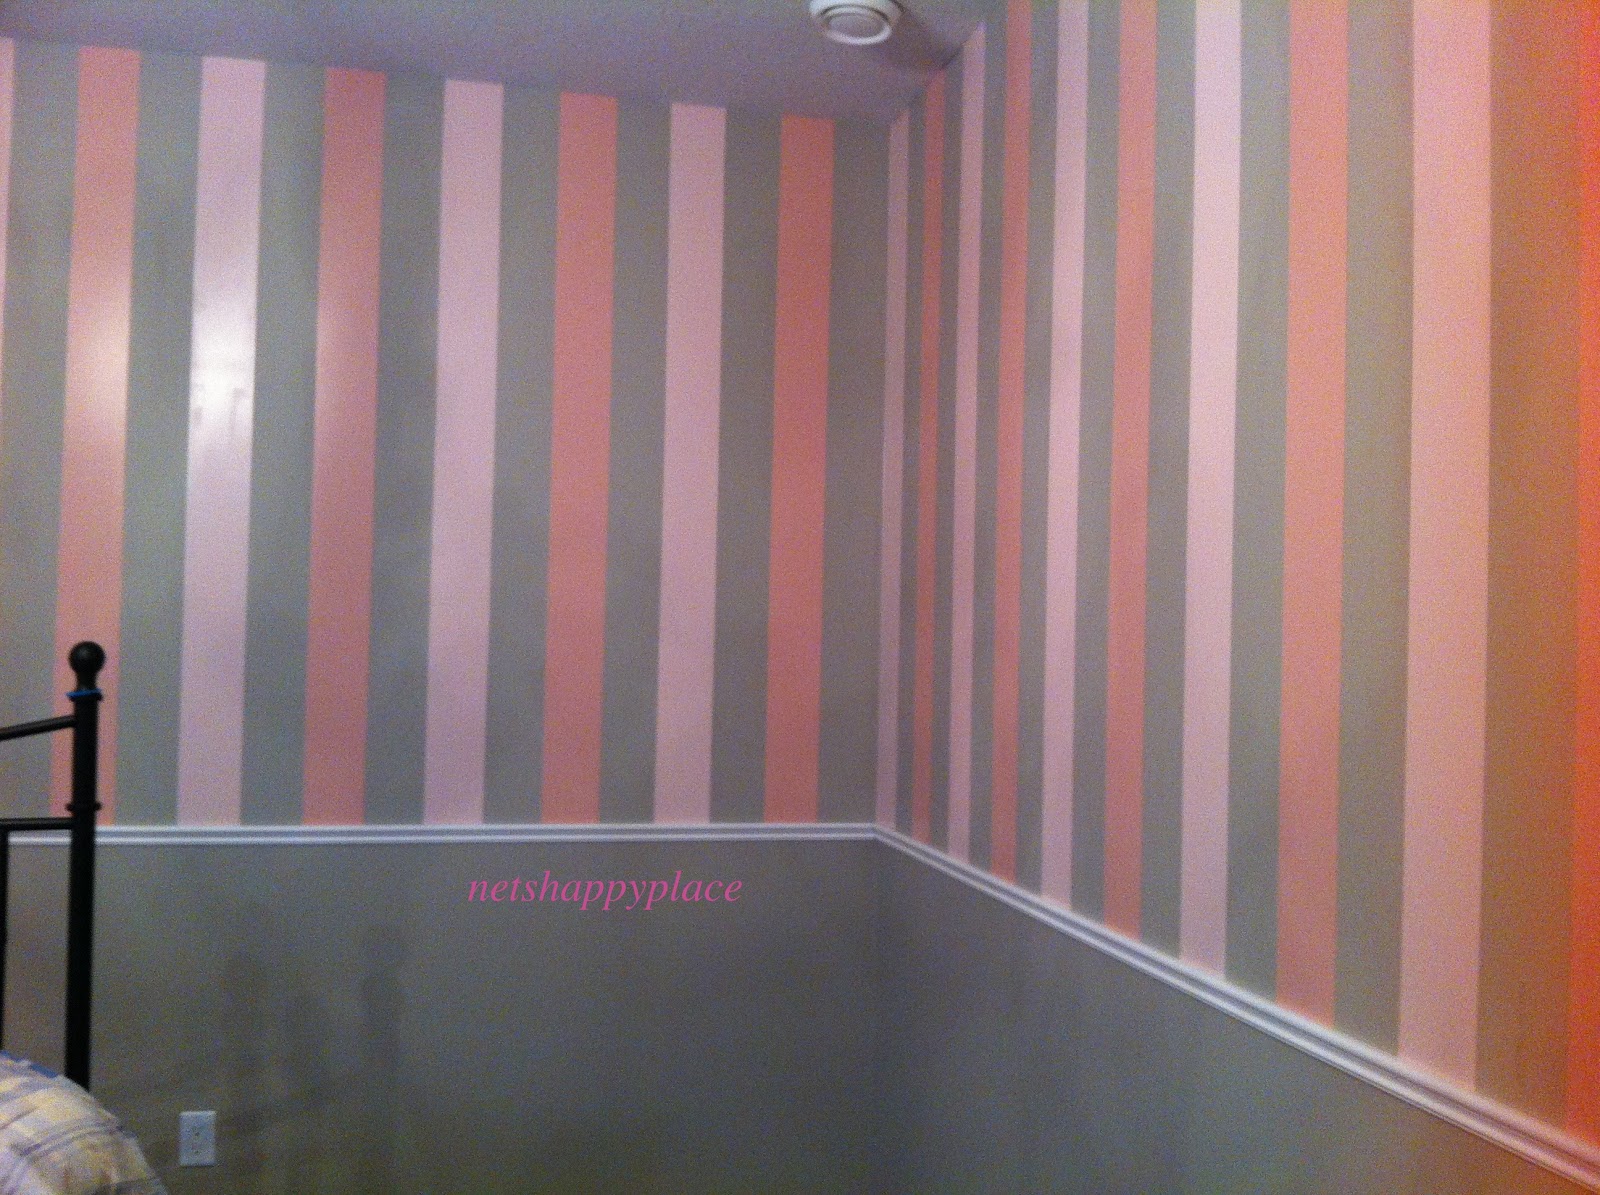
I gave some how-to's on painting stripes under my post "Oiler's Room". This is more of the chair rail detail.
I did use both blue and frog (green) tape on my project, and they were both great. (Better than my last tape, which was meant for protecting moulding from being painted) I would suggest getting to your painting the same day as you tape.The tape I put on the day before left me with some major touch ups due to peeling off my original base coat paint.
Measure your wall and find the centre. (including the wall above your doors). My stripe lines were 5" wide, so, after finding centre, I measured 2 1/2" on either side and made my mark. Work out from the centre. But begin your project in the farthest corner and work around the room. (That way you can hide a mistake if one occurs) Using a pencil, mark which colour goes in each stripe. You will find your stripes will not be equal in the corners, I just left mine as they were. This made my pattern work all around the room.
Use your level. I bought a plastic one with a ruler mark on top. This resulted in no markings on the wall as I measured, and made marking of 5" spaces easy. With the help of Kevin, my hubby, we made a level line around the room for our chair rail. I used this for my guide: where to start my lines and stop painting.
A couple of days later we installed the chair rail, followed by the prefabricated faux wainscoting or shadow boxes. I found these at Home Depot for about $11 each.
Measure the perimeter of your room. I believe most moulding is sold in 8 feet pieces. Divide your perimeter inches by 8. That will determine how much chair moulding you'll need. Our daughter's room was 9' high. We did not follow the 32-40" chair rail guide or the 1/3 of the wall rule. I saw where her chair would hit the wall and made my mark! Plus, because her ceilings were so high, with the stripes going aallll the way up, a "proper" chair rail would have made the ceilings look way too tall and would have been too much stripe.
Using our saw, we cut our pieces at 45' angles for the corners. (Sometimes this angle had to be tweaked as the walls weren't exactly square). Along the wall, when the piece wasn't long enough, cut both the end finishing and the end beginning in the same direction. Like this: \
Be prepared to purchase clear paintable caulking to caulk "inside, outside, upside down" your mouldings. (Quoting Berenstain Bears here…)


I used No Nails glue for the back of my moulding. With help, Kevin and I placed the moulding along our previously marked line on the wall. (Which was perfect because the line was already straight.)


I gave some how-to's on painting stripes under my post "Oiler's Room". This is more of the chair rail detail.
I did use both blue and frog (green) tape on my project, and they were both great. (Better than my last tape, which was meant for protecting moulding from being painted) I would suggest getting to your painting the same day as you tape.The tape I put on the day before left me with some major touch ups due to peeling off my original base coat paint.
Measure your wall and find the centre. (including the wall above your doors). My stripe lines were 5" wide, so, after finding centre, I measured 2 1/2" on either side and made my mark. Work out from the centre. But begin your project in the farthest corner and work around the room. (That way you can hide a mistake if one occurs) Using a pencil, mark which colour goes in each stripe. You will find your stripes will not be equal in the corners, I just left mine as they were. This made my pattern work all around the room.
Use your level. I bought a plastic one with a ruler mark on top. This resulted in no markings on the wall as I measured, and made marking of 5" spaces easy. With the help of Kevin, my hubby, we made a level line around the room for our chair rail. I used this for my guide: where to start my lines and stop painting.
A couple of days later we installed the chair rail, followed by the prefabricated faux wainscoting or shadow boxes. I found these at Home Depot for about $11 each.
Measure the perimeter of your room. I believe most moulding is sold in 8 feet pieces. Divide your perimeter inches by 8. That will determine how much chair moulding you'll need. Our daughter's room was 9' high. We did not follow the 32-40" chair rail guide or the 1/3 of the wall rule. I saw where her chair would hit the wall and made my mark! Plus, because her ceilings were so high, with the stripes going aallll the way up, a "proper" chair rail would have made the ceilings look way too tall and would have been too much stripe.
Using our saw, we cut our pieces at 45' angles for the corners. (Sometimes this angle had to be tweaked as the walls weren't exactly square). Along the wall, when the piece wasn't long enough, cut both the end finishing and the end beginning in the same direction. Like this: \
Be prepared to purchase clear paintable caulking to caulk "inside, outside, upside down" your mouldings. (Quoting Berenstain Bears here…)

Measure from the longest part of your rail when marking. Find your line and gently ease your saw. When it matches up. Cut.

Me making this cut.

Our 45' angle.

Mark your studs so you'll know where to use the nail gun.
I used No Nails glue for the back of my moulding. With help, Kevin and I placed the moulding along our previously marked line on the wall. (Which was perfect because the line was already straight.)


Then the fun part- the nail gun.


along the straight line…
Then the wainscoting.

And finally, the (almost) finished room. (I still have some more nails to tap in, fill and touch up with paint.)

(This bright chandelier is a great addition to this room)


Pictures at night don't do it any justice. It is so cozy and full of warmth.
Good luck with your project!
No comments:
Post a Comment